Showing posts with label pastries. Show all posts

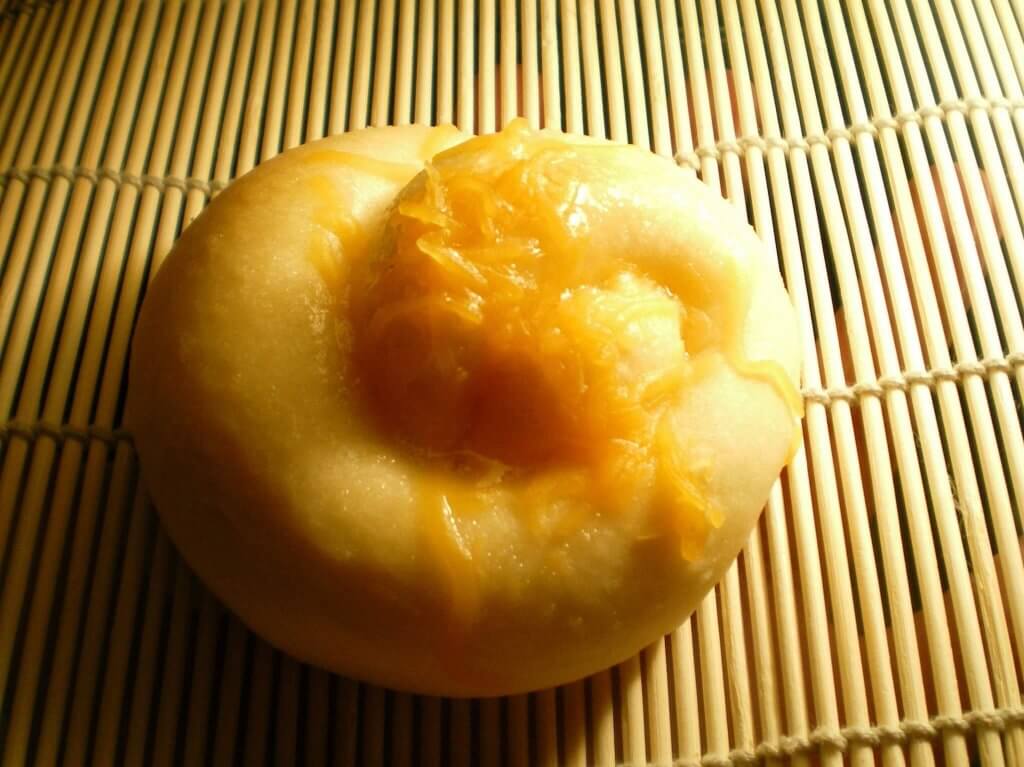
Pan de Coco


0 comments
Yesterday my Filipina friends and I were scheduled (or so I thought) to have a lunchdate at the house of another Filipina, but we decided to meet here at my home before going there. I was the first person called by that hostess, and I was tasked to inform the others about it.

So we went...and our hostess Vengie (in blue shirt, sandwiched by me in yellow and Fe in red) was pleasantly surprised to see us because we were supposed to meet NEXT WEDNESDAY...Ooops! Sorry! (blush!) Though surprised, since she was not able to attend our picnic last August at Ana's (in blue tank top) tabing-ilog, she was pleased nonetheless, although apologetic that she did not cook anything. No problem, because I bought a pan (last batch) of savory chicken feet, some palitaw (which she missed that day I made them the first time), and some pan de coco (one for each of us). Fe brought Alaskan salmon (caught by her husband), and Daisy (the one who holds a baby) brought veggies, rice and fried fish, which we ate with tomato-soy sauce dip. Ana was exempted because of her two babies to take care of.

Anyway, I was not planning to make pan de coco. The night before, I was debating on which one to prepare: palitaw or pan de coco. I thought palitaw was easier to make, so I made those, about 15 pieces, but had excess coconut (about 7 heaping tablespoons), so I ended up planning to bake them the next morning (Wednesday). I used the Parker House Rolls recipe (same dough I use for siopao) was able to make only 9 pieces, and I left the rest of the dough plain. Fe came to my house first, so I offered it, with a warning to have only one ("Tig-iisa lang kayo!"). When she finished it, she was looking longingly at the rest. "Bitin ba?" (Do you want more?) "Bakit kasi konti lang ginawa mo?" (Why did you make only a few?) You know the story...Hehe...


Here's how:


INGREDIENTS:

Prepared dough (any sweet bread recipe; I used same dough as in siopao, but I have also tried Buttery Sweet Bread recipe using bread machine)
grated coconut (either bought frozen, or grate your own; see my palitaw post in old kusina)
white or light brown sugar (Note: I had about 2-1/2 cups of mixed coconut-sugar, proportion of 1 part coconut:2 parts sugar)


Buttery Sweet Bread recipe (dough cycle only; I used 1-1/2lb loaf to make 21 pcs)-

1/2 cup milk
1/3 cup water
1 large egg
1/4 cup butter or margarine, cut up
1 tsp salt
3-1/3 cup bread flour
1/4 cup sugar
2 tsp BM yeast

To prepare Buttery Sweet Bread dough:
Warm all liquid ingredients to room temp (80-100 deg F) and place in BM pan. Then place all dry ingredients. Run on dough cycle (about 1.5 hrs or 1&1/2 hrs or total of 90 minutes).


INSTRUCTIONS:

The night before you serve, mix grated coconut with granulated sugar (white or light brown), 1:2 ratio (i.e., I had 7 heaping tbsp of grated coconut which I mixed with 14 exact tbsp (not heaping) of sugar (you may want to taste first then adjust; really , it is up to you). Let this sit in a covered container in the fridge, so that it draws out moisture from the coconut and creates a wonderful caramel-y coconut-y taste. If you plan to bake right away, at least prepare this before your dough so it will sit for sometime before baking. Also, prepare the dough (you may want to use Parker House Rolls; see my beef asado siopao post) and leave it in the fridge overnight. You may also use the Buttery Sweet Bread recipe as above on the day you are going to bake.

Pinch off dough about size of pingpong balls and place on greased baking sheet to let rise for about 10 minutes, covered with greased plastic.

Proceed with filling the buns the same way you would the siopao. Place on parchment paper-lined baking pan. FLATTEN a bit. See slide show.

Allow the filled buns to rise for 30 minutes, in a warm place free of draft (on top of a flat stove covered with damp flour sack or greased cling wrap, or inside a warm oven).

Bake in 400 deg F for 12-15 minutes (it browns quickly). Brush with softened butter as soon as they come out. Let cool about 1-2 minutes before eating, or about 10 minutes those you will not consume right away, then transfer to wire rack to cool completely before storing in ziploc bags.


When I removed these from the oven, some of the coco-caramel oozed out of the buns and made a somewhat chewy caramel film on the paper, which I detached and savored. Yum!

Vengie, the hostess, asked me to bring pan de coco next week (the real schedule), as she has some Filipino friends who will be coming over from NY. Oh, and she requested to have some yeast rolls baking session with me in the near future (I feel flattered and honored!). She loves baking muffins and cakes, but does not know how to deal with yeast rolls. I love yeast rolls, because I grew up with such (typical ordinary) bakery goodies in PI. Back then, cakes and muffins were more expensive and bought only from SM or some specialty bakeshops, and what I had for ordinary snacks were mostly yeast rolls and breads, in the likes of pan de sal, pan de coco, monay, patigas, "tasty" (American pan bread), spanish bread, ensaymada, pan de regla (we at my father's bakery called them "pula"), etc., and I was lucky to have had any of these fresh and hot out of the oven before they even made it to the display area of our store. Now, I am getting more and more comfortable baking them, and loving the nostalgic trip as I knead and shape the dough. My husband happens to love yeast rolls as well, so although it is quite laborious and more time-consuming than muffins and cakes, I do enjoy making them.
 

Spanish Bread


0 comments
I managed to take photos the last time I made spanish bread, so here goes the step-by-step how-to's. For some reason, my computers (both PC with Windows XP and laptop with Linux) do not currently work well with slide.com. I have not had the gumption to make a new account with Flickr to attempt making slide shows, so I resorted to posting a series of photos here instead.

This is another kid-favorite rolls, they like these more than they do ensaymada, although I made both using the same dough (see my posts on Ensaymada).

(Update on 3/17/2012: I also brought several pieces to work and all my co-workers at the time liked these spanish breads/rolls. Well, the non-diabetics and those not gluten-sensitive ones, that is.)

RECIPE: I used the BM ensaymada recipe for the dough. If you have a bread machine, make sure you use the recipe that your BM bucket can accommodate.  Check your BM manual for instructions. Mine says to place room temp liquid ingredients first then the dry ingredients, then run on dough cycle. Once the dough cycle is over, proceed to the instructions below for making the spanish bread.


Ingredients (3-lb dough):
1 cup milk
3/4 cup water
1 egg
4 egg yolks
1/2 cup (1 stick) butter
2 tsp salt
6-3/4 cups bread flour (plus some more; see note above)
3/4 cup sugar
2 tsp BM yeast

(2-lb dough) - [This yielded 9 ensaymadas and 12 pcs spanish bread]
2/3 c milk
1/2 c water
1 egg
2 egg yolks
6 tbsp butter
1-1/2 tsp salt
4-1/2 c bread flour
1/2 c sugar
1-1/2 tsp BM yeast

For the filling of butter-sugar mixture: 1 stick of softened butter (1/2 lb) + 1 cup white sugar. Adding 1/4 cup breadcrumbs to this mixture somehow aids in keeping them inside the rolls and minimizing the oozing when they melt. Some also prefer brown sugar.


Instructions:

Prepare the dough. Divide into portions the size of a golf ball. Mix sugar (your choice: brown or white. I prefer white.) and softened butter/margarine (I can't specify the proportions because I approximated. I just kept adding sugar and mixing until I got a consistency that was gritty yet spreadable.)


Flatten each piece
Flatten each piece with a rolling pin as shown. Go ahead, don't be afraid...Start from the middle outward up and down, especially adding pressure at the ends so they stick to the table/countertop. That way, they don't roll back or spring up.

Spread filling
Spread a good layer of sugar-butter mixture. Avoid the ends so you can seal properly.

Roll tightly
Roll tightly. Make sure end seals.

Coat with bread crumbs
Roll in breadcrumbs to coat.

Place on baking pain SEAM side DOWN
Place on baking pans with seam side down. (Note: Either you grease your pan with a thick coat of shortening or better yet, use parchment paper.)  Cover with plastic (to avoid drying up). Let rise for 15-30 minutes (depending on what yeast you used and the humidity/temperature of environment). Alternatively, you can place the pan uncovered inside the oven which is warmed up for one minute.

Bake at 350 deg F for 12-15 minutes or until golden brown.  (If you have too much for one-time serving and want to reheat these in the future, bake only for about 10 minutes initially, so when you reheat they won't look burnt. I reheat 2-3 pieces for merienda in an oven toaster at 350 deg F for about 3 minutes or so.).

(If you want them really mestisahin, bake at 325ºF for 15 minutes.)

You may want to let these stay on the pan so that their bottoms soak up the melted caramel until the caramel solidifies into sort of candy. Then transfer to the cooling rack to cool completely before you store in ziploc bags.

STORING:

When you cannot eat all freshly baked spanish bread, after cooling in the wire rack for about 30 minutes, they should be warm (not hot) or almost room temp. That is the perfect timing to place them in ziploc bags and close. Observe after several minutes if they sweat. If they do, open the bag and let the excess moisture evaporate some more, wipe the sweat inside the bag with paper towel. Whey they do not sweat anymore, close bag tightly. When done at the right timing, your spanish bread will remain soft for 3 days without having to reheat them. But then, I myself prefer heating them up in oven toaster for about 3 minutes. And these do not last more than 3 days (or even a day!) for my family.

Ensaymada


0 comments
Ensaymada is a Filipino sweet pastry. This is said to be a variation of the Ensaimades, a similar bread that uses pork lard as an ingredient that originated in Majorca (the largest island of Spain).

In the Philippines, this pastry is available in any neighborhood bakery and the well know bakeshop chains as well.  This is one of my favorite mid-afternoon snack and I usually have it with brewed coffee.


Ingredients:

5 cups all-purpose flour
¾ cup butter, melted
¾ cup white sugar
1 tsp salt
1 cup grated cheddar cheese
3 pieces raw eggs
1 pouch rapid rise yeast (about 2 ¼ tsp)
1 cup fresh milk, warm


Cooking procedure:

1. Combine warm milk, yeast, and ½ cup sugar and stir until yeast and sugar dissolves in milk. Set aside to let yeast activate (approximately 10 minutes)
2. In a mixing bowl, combine all the dry ingredients starting from the flour, sugar, and salt then mix thoroughly.
3. Add the eggs, 1/2  cup butter, and activated yeast mixture (these are the ingredients that we combined in number 1) to the mixed dry ingredients. Mix thoroughly until all ingredients are evenly distributed and a dough is formed.
4. Knead the dough until texture becomes fine.
5. Put the dough back on the mixing bowl and cover the top with cloth. Allow the dough to rise for 2 hours.
6. Put the dough on a flat surface and flatten. Punch the dough lightly to release the air inside.
7. Using a dough slicer, divide the dough into four pieces.
8. Roll each piece until shape becomes cylindrical.
9. Cut the cylindrical dough into individual serving pieces (1 serving piece should weigh at least 80 grams).
10. Put the sliced individual serving piece in a flat surface and flatten using a rolling pin.
11. Combine ¼ cup melted butter with ¼ cup white sugar. Using a brush, paint the mixture on the flattened dough. Make sure to paint only the center part of the flat dough.
12. Sprinkle some cheese over the painted area then seal the dough by folding opposite directions and rolling it until a long cylindrical shape is formed (about 14 inches in length).
13. Start forming the spiral Ensaymada shape by crossing the two opposite ends of the dough. The first end should be placed under dough while the other end should be inserted in the middle. (see video for better comprehension)
14. Place the dough in a baking tray with wax paper and cover with cloth. Set aside to rise for another 45 minutes
15. Pre-heat the oven at 350 degrees Fahrenheit for 10 minutes. Remove cloth on top of the tray and bake the dough for 15 minutes at 350 degrees Fahrenheit.
16. Remove the baked Ensaymada from the oven. Using the remaining melted butter and sugar mixture, paint the top of the baked ensaymada and sprinkle additional cheese.
17. Serve hot. Share and Enjoy!

Espasol


2 comments
Espasol is a Filipino sweet that is sold on the streets and is a local favourite.  It is a sweet made of rice flour cooked in coconut milk.  As with most sweets there are several ways of making Espasol.  I added pinipig for extra rice flavour.  I also added grated young coconut meat to give it another texture.
My Mum and I have dedicated Fridays to our cooking and baking adventures.  I love cooking with my mum as she has the same love for cooking as I do.  I supposed that’s who I get my passion from.  But most of all, I love to learn from her.  

We have been wanting to make Espasol for a long time.  It’s one of my all time favourite Filipino sweets.  We have been given some while holidaying in Philippines and I devour them very quickly.  We are, therefore, so happy to find out that this sweet is so easy to make.  We plan on making this again very soon.


3 cups of ground rice flour, toasted in a dry pan. Set aside and cool


Rice Flakes (Pinipig)


Toast the pinipig in dry pan then ground finely
In a bowl, mix together the rice flour and the pinipig.  Dust a clean surface (bench or baking sheet) with 1/2 cup of the mixture and reserve another 1/2 cup for rolling out the espasol.


Fresh young coconut


Young coconut split in half.  Reserve the juice.


Grate the coconut meat


In large pan mix together, 800ml coconut milk, coconut juice, 11/4cup sugar and 1/2tsp salt.  Bring to the boil then lower the heat and simmer for 5 minutes.  Stir in 1 tbls vanilla extract.  


Add the rice flour and pinipig mixture and stir continuously until it is very thick and fairly dry for about 5 minutes


Spread out the mixture over the prepared surface.  Flatten and smooth with a flat spatula and let cool.

.

When cooled you can now shape the mixture into whatever shape you like.  You can shape them into balls, triangles or logs, like I do.  Dust your hands with the flour mixture as the batter is quite sticky.   Dust the espasol with the remaining flour mixture to keep them from sticking together.

Serve Immediately or can be refrigerated for up to 3 days.

Pastillas De Leche


0 comments
Pastillas de leche is one of the well-loved desserts from the Philippines, where people get fresh milk from carabaos or water buffalos and make them into these mini-logs of sweet and succulent milk candies.

Making pastillas is as easy as 1-2-3 and you even need only a couple of main ingredients to make it: milk and sugar.

While cow, goat, or commercial condensed milk may be used, the authentic pastillas de leche from the Philippines makes use of pure carabao’s milk wheedled out of carabaos ploughing the rice fields in the countryside.

What’s the difference? Carabao’s milk is said to be creamier and richer, giving pastillas de leche a distinct, luscious, melt-in-your-mouth tang. Plus, the texture should be extra-smooth, almost velvety.

Carabao’s milk is plenty in the Philippines and in other Southeast Asian countries. Elsewhere in the world, people can buy carabao’s milk in Asian stores.


Genuine Pastillas de Leche – Ingredients and Tools
  • 1liter of pure carabao’s milk (substitutes: cow’s or goat’s milk)
  • ¾ cup sugar (1/2 cup sugar if cow’s or goat’s milk is used)
  • 1 teaspoon cornstarch
  • pan
  • ladle for stirring
  • bowl
  • board
How to Prepare Pastillas the Traditional Way
  1. Pour one liter of fresh, pure carabao’s milk into a pan and add in ¾ cup of sugar. If cow’s or goat’s milk was used, cut down the sugar to ½ cup.
  2. Add ½ teaspoon of cornstarch into the mixture, making sure everything is well-set.
  3. Put the pan over medium heat. Stir slowly and continuously until the mixture of milk and sugar thickens a bit. Once the mixture is thick, lower the heat.
  4. Over low heat, continue stirring the gooey milk mixture until it forms into a mass that can be lifted off from the pan with the ladle.
  5. Put the mass of pastillas into a bowl. Let it cool for a few minutes.
  6. While waiting for the pastillas de leche to cool, sprinkle ½ teaspoon of cooked cornstarch on a board.
  7. Once cool, get a small lump of pastillas then roll it onto a board, making logs of milk candies.
  8. Trim the logs of milk candies into desired length or size.
  9. Cut out pieces of bond and Japanese paper.
  10. Place each piece of pastillas into Japanese paper. Then, wrap each of them further into bond paper.
Notes about this Pastillas De Leche Recipe
  • It takes more or less 45 minutes to process one liter of fresh carabao’s milk into pastillas de leche.
  • That much carabao’s milk can make about 50 pieces of pastillas that each weighs five grams.
  • If cow’s or goat’s milk was used, about 40 pieces of pastillas de leche could be made.

Crema de Fruta


0 comments
Crema de Fruta is a Filipino dessert elaborately made-up of sponge cake, topped in succeeding layers of sweet syrup, custard, candied fruit (fruit cocktail), and gelatine. A mainstay during Noche Buena and the holidays, this dessert has always been a Filipino Favorite since time immemorial.

Preparing this dessert is quite complicated when compared to others but I can assure that your patience and hard-work will not go to waste. In my case, I started to record the video late in the evening (around 10 pm after arriving from work) and I am so thankful because my wife and kids helped out (or else it will take me forever:)). Also, it gave me a reason to wake-up early the next morning.

I’m sure that you will love this recipe.


crema-de-fruta-2


Ingredients:
1½ cup flour
1 tsp baking powder
8 pieces egg yolks
1 3/4 cups sugar
1 big can fruit cocktail (about 30 ++ ounces)
2 tbsp unflavored gelatin
4 cups milk
1/3 cup butter
1 ½ tsp vanilla extract
2¼ cups water


Procedures:

1. Bake the Sponge Cake
1.1. Sift (salain) the baking powder and 1 cup flour using a flour sifter then set aside
1.2. Put the 4 egg yolks in a mixing bowl and beat until texture becomes thick.
1.3. Add-in ½ cup of sugar slowly while beating the egg
1.4. Slowly add the sifted flour and baking powder mixture and mix the ingredients thoroughly
1.5. Combine 1 cup milk, butter, and vanilla extract in a sauce pan then cook until butter melts
1.6. Pour the cooked mixture (milk, butter, vanilla extract) into the mixing bowl and mix with the existing concoction until evenly distributed
1.7. Preheat the oven at 350 degrees Fahrenheit
1.8. Pour the combined mixtures in a baking pan then bake for 23 minutes or until sponge cake is ready
1.9. Set the Sponge Cake aside
2. Distribute the Sweet Syrup on top of the Sponge Cake
2.1. Heat the saucepan and place ¼ cup of sugar
2.2. Add ¼ cup of water immediately and cook until the sugar completely dissolves then let cool for a few minutes
2.3. Distribute the sweet syrup on top of the sponge cake (I apply the syrup using a brush)
3. Put a layer of Custard on top of the Sponge Cake
3.1. Combine the ½ cup flour, 1 cup sugar, and 3 cups milk in a saucepan then cook while stirring until the mixture thickens
3.2. Put some of the cooked mixture on the bowl where the 4 egg yolks are placed and mix well
3.3. Pour-in the “egg yolk – cooked mixture combination” back in the saucepan (with the rest of the ingredients) then mix until texture is thick enough (this is now the custard)
3.4. Apply the layer of custard evenly on top of the Sponge cake
4. Drain the liquid concentrate from the fruit cocktail and set aside.
5. Put all the fruit cocktails on top of the custard layer. Make sure to place them evenly
6. Dilute the gelatin in 2 cups of water
7. Heat the saucepan then pour the diluted gelatin and fruit cocktail concentrate and bring to a boil
8. Immediately after boiling, turn off the heat and let cool down until temperature is a little above normal room temperature
9. Pour the gelatin mixture on top of the fruit cocktail layer
10. Refrigerate (preferably overnight)
11. Serve chilled for dessert. Share and Enjoy!

Leche Flan


0 comments
Leche flan is a favourite and popular dessert in the Philippines. It is similar to a cream caramel. It is sweet and rich.
Leche flan is a must during Christmas, New Year and fiestas. Nowadays, making leche flan become part time job for some family who would like to earn extra money. Since making it takes a lot of time, busy people would just like to buy it over the counter or order leche flan for the Holiday celebrations, you will now find leche flan being sold in the market and delicacy stores or order over the phone and deliver to your door.
Like any other popular dish, there are many variations in making leche flan, but the classic recipe only calls for eggyolk, sugar, evaporated milk, condensed milk and citrus flavourings. Steaming is the traditional method for cooking leche flan, and is usually prepared in an oval shaped metal pans called Llanera and steamed over moderate heat until set.
It takes a while to master the techniques and perfected this recipe but it is worth it.

Ingredients:

12 egg yolks

2 cans condensed milk (14 oz.)

5 cans small evaporated milk

2 cups fine white sugar

2 tablespoon vanilla or

¼ teaspoon grated dayap rind (optional)

You will also need the following:

  • Llanera

  • Steamer

  • Strainer

How to make the Caramelized Syrup :
  • In a stainless steel pan, dissolve 3/4 cups of sugar, add 1/4 cup water over medium heat, do not stir, just swirl the pan gently, caramelize in low heat if you don't want it burnt. Pale brown means sweeter and too dark means bitter. When you have achieved the desired color, pour the syrup in the llanera and make sure to coat all the parts of the pan.
How to make the Custard:
  • In a mixing bowl, combine all the egg yolk, condensed milk, evaporated milk, sugar and vanilla. Use a whisk to mix thoroughly but gently to prevent bubbles from forming. Remove any solids by using a strainer.
  • Pour the mixture in the llanera and cover it with an aluminum foil, so that the moisture from the steam won't come in the pan as it will become watery.
  • Steam Cook for 40-45 minutes, or until knife inserted in the center comes out clean.
  • Remove the llanera and let it cool at room temperature. Then refrigerate for several hours before serving.
  • To unmold the leche flan- run a sharp knife around the edge and carefully invert it unto a platter or serving dish, let the caramelized sugar flow over the leche flan.
This recipes makes 4- 5 llanera of Leche Flan.
Leche flan is a popular dessert to to eat with Suman (sticky rice) or serve with sweetened macapuno (young coconut) and ube (purple yam), or just serve as it is.

If you don't have a llanera you can use a regular flan or custard pan.
If you don't have a llanera you can use a regular flan or custard pan. 

Sans Rival


0 comments
What do you get when you mix meringue, buttercream and almonds? Sans Rival, what else? The photo and title says it all, what more can I add to it? Delicious, rich, mouth-watering, diet buster, calorie laden dessert. Ah, one shouldn't think of diets when enjoying this dessert. This is one of those rare times that eating it is worth sacrificing 1 day off your healthy lifestyle. That's why you don't eat Sans Rival every week, you're only allowed to have this dessert uhm once every year? Ok, maybe once every six months.


The name Sans Rival is French, meaning 'without rival'. Nobody knows where this dessert originated but it sure has some European characteristics. It's like Napoleons. It's an Almond torte and consists of layered crispy meringue with almonds and buttercream. There is also another dessert that is similar to this called Sylvannas, the only difference being the Sylvannas is shaped like a huge egg but it tastes the same.

I grew up eating Sans Rival from Goldilocks. This is one of my favorite desserts from that popular Filipino bakery along with Mocha and Ube rolls. When I moved to Northern California 20 years ago, I was ecstatic when I learned that Goldilocks is just a drive away. I got a sticker shock though, a small square of Sansrival costs $25 (back then). No wonder it's expensive, it's a little complicated to make this. There aren't a lot of ingredients but it takes a lot of work to assemble the whole thing. After many years of wanting to try to make this dessert, I finally did it two weeks ago. I was thinking of what dish to bring to a party when I decided to make dessert. It turned out quite good, very good, in fact. Would I make it again? Hmm, yes I will (if somebody pays me to do it LOL). I used almonds instead of cashew nuts just because. If you are a novice baker, then I would suggest you buy it instead of trying to make it. :o) For an expert baker, this is quite easy to make. All you need is a lot of patience and Reynolds Release non-stick aluminum foil. If you don't have this special aluminum foil, use baking paper or parchment paper.


SANS RIVAL
for the wafers:
10 egg whites at room temperature
1/4 tsp cream of tartar
1 cup sugar
2 cups finely chopped almonds
for the filling and frosting:
6 egg yolks
1/2 cup light corn syrup
2 tbsp water
1/4 cup sugar
2 sticks butter at room temperature (1/2 lb)
for the topping:
1/2 cup finely chopped almonds
- Beat egg yolks until it turns light yellow.
- Heat corn syrup, sugar and water over low heat. Cook for 2 minutes after it boils.
- Pour the syrup into the egg yolk slowly while beating on medium speed. Set aside to cool down.Cream softened butter and gradually beat in cooled yolk mixture.Set aside.
- Preheat oven to 325F. Line three cookie sheets or jelly roll pan with parchment paper. Generously grease and flour the parchment paper (very important so the meringue will not stick; if you use the Reynolds Release foil, then you don't have to grease and flour)
- Beat egg whites and of tartar until soft peaks form. Add sugar a tablespoon at a time, beating well after each addition. Beat until stiff.
- Fold in ground almonds.
- Spread evenly on the cookie sheets about 1/4 inch thick. Bake for about 30 minutes or until golden brown.
- Cut the wafer into desired size while still warm. Peel off the paper or foil. If the parchment paper is sticking, cover with damp towel for a minute or so.
- Spread the frosting thinly on top of each meringue and stack another meringue, repeat with the layering . Don't put too much frosting in each layer or you wouldn't have enough to frost the outside of the Sans Rival.
- Sprinkle chopped almonds on the top and sides. Chill in the fridge for a couple of hours.


Polvoron


0 comments
When we were still living in California, we were spoiled with having a Goldilocks store in the next town. Whenever dh had some craving for polvoron, we'd drive to Union City and stock up on different pastries. Whenever I or any of my relatives go back to Manila for a vacation, we would bring packs of polvoron as 'pasalubong' for dh and the kids.

Polvoron Molds Now that we live in the East Coast, getting Goldilocks polvoron is not that easy. There are some stores in New Jersey and New York that sell these but of course it costs more and I live four hours away.:( Goldilocks also has an online store but then the shipping costs more than the product you are ordering since they only ship 2nd-day Air. So we just ask my cousin who lives near a Goldilocks store in Southern California to buy the polvoron and ship it to us. It is not cheap either. One bag (12 pcs.) costs $15, they sure have a big profit margin on this one. This set-up worked out fine until the last shipment.

Polvoron
It tasted different this time. Dh noticed it too. Gone are the rich and buttery taste. Now it is bland and dry. Because of this, I decided to make my own polvoron. And why not? I remember making this during Home Economics in sixth grade. :) I also have the polvoron molds sitting in a drawer, I asked my mom to get these for 3 years ago. I have not used it since I received it, I guess I'd better start now.


These polvoron tastes just like Goldilocks'. Making it is very easy and definitely costs less $. I used a stand mixer to incorporate the rest of the ingredients into the flour, it is much easier that way. The kids enjoyed helping me make the polvoron. It is very easy for them with the help of the mold. If you would like to wrap these, you can use 'tissue paper' (like the ones you use for gift bags).


Polvoron

1 cup sifted All-purpose flour
1/2 cup full-cream powdered milk (KLIM or Nido)
1/2 cup sugar
1/2 cup soft butter
1/2 tsp vanilla extract

-Toast the flour in a pan over medium heat.
-Stir continuously until light brown.
-Transfer the toasted flour to a mixing bowl.
-Add the rest of the ingredients to the bowl and mix
well.
-Use the polvoron mold to form the mixture.
-Refrigerate for at least 30 minutes.

Variations:

Pinipig Polvoron:
Add 1/4 cup toasted Pinipig

Chocolate Polvoron:
3/4 cup All-purpose flour
1/4 cup sifted cocoa powder
1/2 cup full cream powdered milk
3/4 cup sugar
1/2 cup soft butter


older post